10 Ways to Wear a Braid

A little over a month ago, I guest posted on Ma Nouvelle Mode about 10 ways to wear a braid. I thought that post was pretty cool... and awesome enough that I needed to share it on my own blog.

So here we go...

10 ways to wear a braid. Are you ready for it? Count 'em. It's 10.

  1. Three by three
  2. Halo braid
  3. Braided side topsy tail
  4. Headband braid
  5. Braided chignon
  6. Double plait to a messy bun
  7. French braid a la bun
  8. Fishtail
  9. Boho braid
  10. Twist Braid
Some are easy, and some are a bit complicated. Luckily for you, if you click each link above, it will take you to my page so you can learn how to do those braided hairstyles.

Which braid are you just dying to try?? Some are cool... some are just not my style... but rock it, sister, if it's your thing!

bloglovin

Show Me Your Hairstyles!


 I mustache you to do me a favor...

You've seen the hairstyles.
You may have tried a couple on yourself.

And now I'm asking you
to send me photos of YOU trying MY hairstyles.

You'll be featured right here on my blog.
If you want, you can even write a little about your hairstyle
(like if you modified it to work better for you).

OR-- if you have a favorite hair style that you'd like me to try,
do it up, sister!
Email me a photo and a how-to
and I'll feature YOUR photo as my inspiration for the style.

Want to join the fun?
Email me and let's get this party started!

bloglovin

2012 Hair Trends


While browsing my Google Reader the other day, I read this post about up-and-coming 2012 hair trends. It suddenly occurred to me that I don't necessarily agree with that article.

In fact, almost all hairstyles are trendy these days. I mean, come on people... it's 2012. There isn't hardly anything that anyone could wear or do to their hair that isn't "in" these days.

Except one thing. You totally know what I'm talking about.

In my opinion, the ONLY trend that is not in? 


So stop it already. Mullets are NOT cool! In fact, I saw one walking around TJ Maxx the other day... it was hideous!

Other than that? Have a ball this year with braids, buns, waves, straight locks, perms... anything. Because I promise, unless it's a mullet... it will be cool.

bloglovin

Beach Twist in Winter? You Betcha!


I think I need to let you in on a little secret. The beach twist is NOT just for summer weather. In fact, it makes a really sleek, elegant updo that you can wear to work anytime of the year.

Last time I did this hairstyle, I tried the beach twist on dry hair. This time I only had a few minutes before I had to leave for work, so I pulled it back when it was wet. I also changed the steps for the last tutorial I made for this one a bit. They are as follows:
  1. Run a comb through your wet hair to get rid of any tangles.
  2. Create a deep side part. 
  3. On the side with the part (less hair), begin twisting a piece of hair right by your scalp.
  4. Add in sections of hair as you twist, twisting it low by the hairline along the back of your head and toward the opposite ear.
  5. When you have it to where you're going to want your bun (just below the opposite ear for me), add a clip to keep it secure for just a moment.
  6. Begin the same process on other side.
  7. Twist along your scalp until you've reached the place where you want your bun and your hair from the other side is clipped.
  8. Remove the clip.
  9. Twist both sections together in another twist. Secure this bun with Spin Pins.
  10. Bobby pin any loose pieces that might be too short to wrap around the bun.
  11. You can totally add a flower if you want... but it's gross and dreary here in Idaho... and I just thought the sleek look was more appropriate.
I remember in last time I did the beach twist, I commented on how dark it looked. That was a little over a month ago. I am amazed at how much darker it is NOW. Holy moses.

xo

bloglovin

Braided Updo


Do you remember the adorable girl I talked about, named Emily, who sent me the email asking me to do the Holiday Updo?

Welp, she's amazing because she sent me another Hey Kayli video and asked me to give it a go. Kayli had titled the video New Year's Eve Updo... but I think it's just more of a braided updo. I gave it a shot, and almost followed her directions to a T (but had to make adjustments because she does a lot of teasing and hairspraying). Would you like to know my version? I knew you would.
  1. Begin with brushed hair. 
    • I think mine would have worked better if it had a it of a curl at the ends.
  2. Separate out two sections toward the front of your hair to be braided. Pin them aside so you can do your braids.
  3. Kayli did her braids first, and then did the bun. I think it's easier to do it the other way around. Gather the hair at the back of your head, twist it into a ballerina bun, and secure it with Spin Pins.
    • Spin Pins are awesome for days when you're on the go and don't have time for a fancy updo, or if you're looking for a really classy, sleek look.
  4. Begin braiding the side sections that you had pinned. 
    • Instead of making a regular plait like Kayli did, I instead did a French braid with my hair. I think it makes it a bit fancier.
  5. Take 1 section of your braided hair and wrap it across your bun. Secure with a bobby pin.
    • One side may have a longer braid if you part your hair on the side. 
    • I chose the shorter side (right side) so the ends could be covered by my longer side braid.
  6. Take the second, longer braid and wrap it over your bun, across the first braid. Secure it with a bobby pin on the other side of your bun.
  7. Wrap the loose end of the braid under your ballerina bun to cover it.
    • If you have longer hair, it would be cool to also wrap the ends of the braids around the bun to give it a cool, multi-dimensional look.
  8. Tug on a couple pieces (lightly) to give the bun and braids a bit of volume.
  9. That's it!
I hope those directions make the slightest bit of sense. If they don't... just head to YouTube and check the video that Kayli made. 

So>> want to know something random? The girl who got her hair done in the video (CarlieStylez) used to live in Idaho. We were all friend with the same people. I saw the video and was like... wait, I know that face!

What a small world it is, huh?

I hope you like it! Try it and send me pictures! xo

PS>> PS>> I'm having a GIVEAWAY over at Aunie Sauce. It's open until January 24th and is for a beautiful leather bracelet. Get yourself entered!!!


bloglovin

Confessions of a Blondaholic.


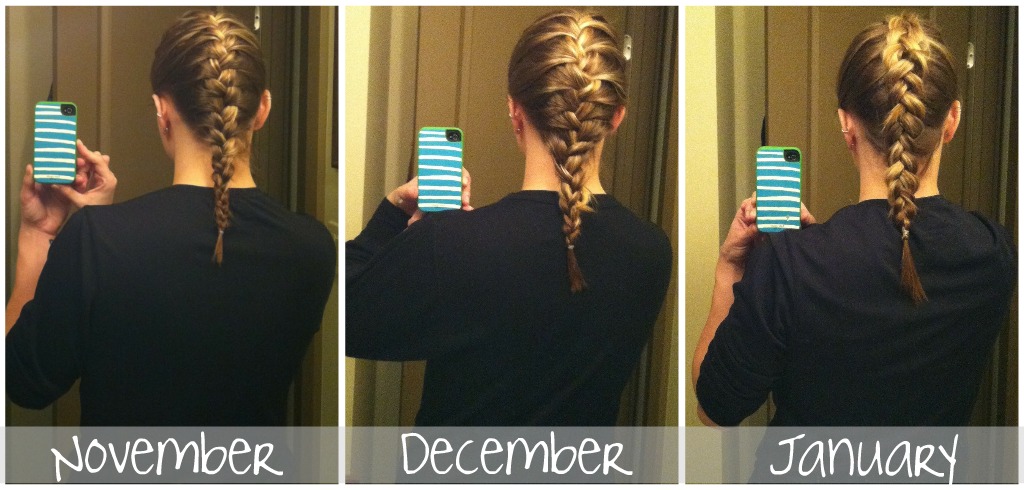
It has been three months since the beginning of Bye Bye Beehive.
I'm slowly beginning
to go
INSANE.

See, since I was a baby,
I have always been a blonde.
The only times I was a brunette were when I was 18 (for like a week),
when I was 21 and cheerleading for Boise State (for a few months),
and last February just because I felt like it.
Each time I made the transition,
my nanny (grandma) cried.
So I always went back to blonde.

When I began this project,
I called my nanny and told her I was sorry
because I wouldn't be a super-blonde again for a while.
I'm pretty sure she cried again.

I think I'm the one crying now. 
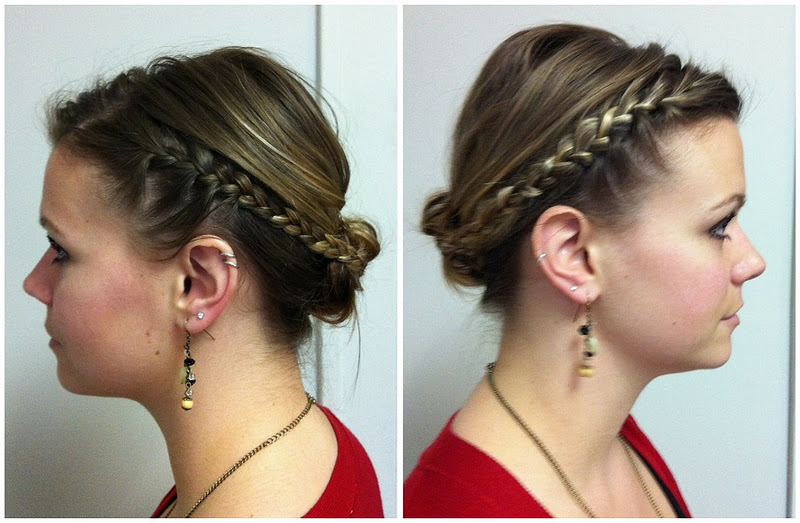
My hair has officially taken on that color scheme we like to refer to as ombre.
Somedays, it's cool.
In fact, it would be really cool 
if I could straighten and tease it,
or spiral curl it and make big, ombre movie star hair.

However, that's not quite the case.
It hangs on my head.
It's limp.
It's uuuugly.
But it's getting healthier, at least.

Anyway... I miss being a super-blonde.
That's my confession.
Oh well.
Only 268 days left.
Ouch.

Half Updo.


Just the other day, one of my best girlfriends, Alyssa, sent me a Pinterest pin and asked me to try this style.

So I did what any decent friend would do and whipped it up the next day. Granted, mine looks NOTHING like the photo (because hers it totally teased and awesome). I'm fairly certain that mine turned out way different because there were no instructions to go along with it. So hey, I just went for it.

Since the style didn't come with a how-to, how about I provide some sah-weet step-by-step action for you? You're welcome.
  1. I began with crimped hair that I had loosely braided the night before.
  2. I gathered the top section of my hair (still with a part) and secured it at the back of my head with a barette. 
    • In hindsight, I should have used bobby pins or a clear hair elastic. That would have been much easier to cover than my big old barette.
  3. Then, beginning with small sections below the top portion that was already baretted, I would take a section from each side of my head and pull it back to cover the barette and then pin it. I let the loose end hang down. In fact, they kind of add different dimensions and layers to my hair which is pretty cool.
    • If your hair was curly, the loose ends could make a really cool layered look.
  4. I criss-crossed sections like that until I had half of my hair pinned up. 
    • I'm a little disappointed the criss-crossing didn't show up better. It just looks like 2 pieces that were crossed, when it was really 4 or 5. I'm going to follow my instructions a little better next time and maybe not try to hide the bobby pins so much. 
  5. I added 2 flower pins to hide the last big bobby pin that just wouldn't disappear under the criss-crossed strands.
And voila! A hairdo that can be casual, formal, or as Alyssa is thinking "perfect for her wedding day hair!"

Right-on girl. That makes me so happy. What do you think?

xo

----UPDATE----

After checkin' her blog, I discovered she's a professional hairstylist. Sheesh! No wonder hers looks so much better than mine! Don't judge, ya'll!!!

bloglovin

Month 3.


Look at that growth!

My hair, from the top of my scalp to the bottom layer going down my back, measures 18.75 inches. It also currently has 4.75 inches of grow out. That's an overall growth of 2.25 inches from October!

My AWESOME hairstylist Lindsey.
October 10, 2011 to January 10, 2012

After comparing the Day 1 and Month 3 photos... I'm astonished at how dark my hair has gotten. Both photos were taken at the same salon, at the same time of day, with the same light. Whoa. That's some crazy stuff!! Since I'm not allowed to cut or color during this time period, I went in for just a simple trim to keep my hair healthy. There's no point in growing it out if I'm not going to take care of it, right?

Also, since it's the 3-month mark... I get to make my first quarterly $50 donation to St. Luke's. I'm so excited. My donation is going directly to cancer patient assistance, which helps patients in need who can't afford important basics such as temporary housing, meal vouchers, medications, gasoline and transportation vouchers to travel to and from the hospital, help with utility bills, and food.

Want to join me with this incredible project? Make a difference, donate to St. Luke's cancer patients now and join my Pledge for Patients. Help out people who are truly in need.

As for me... I'm off to make my donation... and to celebrate making it to the 3-month mark!! Whoopeeeeee!!!

The Sponsor Buzz: January


Happy Monday! Can you believe it's already past the first week in January? It's also almost my 3-month mark for BBB! Whoa!

Today I'd like to introduce you to a sweetheart named MacKensie... take it away, girl!


Hey folks! MacKensie here. I'm a 22-year-old college graduate (Go Gators!) trying to figure out what to do with my life. I started this blog as a way to express myself and my many different interests. I cover topics like health and fitness (I recently ran a half marathon); hair, makeup and fashion (on a budget, of course); my favorite books; arts and crafts; and dairy-free cooking adventures (I am severely lactose intolerant, which is very difficult for a devoted cheese connoisseur like myself).

I have a very sweet boyfriend, a hilarious and eccentric family, super fun friends and the most amazing dog in the whole world

I really hope you all will visit my blog, I'd love to have you!

Thank you so much, Annelise, for having me!

Want to see miss MacKensie in action? Check her out here:


Oh-- and if you want to sponsor (or swap) Bye Bye Beehive-- be sure to email me! Xoxo

Fishtail Braiding.

Happy Friday! I know you guys always see me doing my own hair, but this past weekend I had the opportunity to braid hair that belongs to two beautiful ladies.

I find that my hair isn't really long enough to create awesome fishtail braids, and when these ladies asked to be braided... I knew I had to try my hand at some fishtails. 

The rockin' blonde is Mr. Daniel's mom, Michelle. Michelle's hair is so incredible thick. It is literally horse hair. I am soooo jealous. For Michelle, I created a simple French fishtail down the back of her head.


This cutie ginger is one of my besties, Lindsey.  Lindsey's hair is amazing. It will do absolutely whatever you want it to do. Lindsey's hair is amazing. It will do absolutely whatever you want it to do. I began by just French fishtailing a top section of her hair and securing it with a clear elastic. Then I decided I loved her hair so much that I just wanted to keep going... so I added a fishtail braid at the bottom. 


How did I do?? I am so thankful to have such beautiful and wonderful ladies in my life! xoxo

Crochet Me Happy.


Are you ever wondering what to do with leftover crimped hair from a braided updo the day before? Why not add a simple crochet headband and walk out the door? Sounds like a great idea to me!

P.S. In 2012 I'm learning to say no... and lately managing 4 blogs is slightly overwhelming.  Yes. I have 4 blogs. Silly me. Simply Aunie, LastLash, No Naked Nails, and of course, BBB.

In lieu of wanting to keep my blogging time under control, I'm planning on posting on here Mondays, Wednesdays and Fridays. However, if you want to keep up with my daily happenings, make sure to visit Simply Aunie. Oh-- and I'm also running a sponsor special on that blog. Buy 2 months, get the rest of January free! Come on over, will ya?

NYE Hair.


I had absolutely the hardest time trying to figure out what to do with my hair for New Year's Eve. There was the Holiday Updo, the Braided Bun, the Headband Chignon... I just had too many ideas.
I resorted to asking Daniel and his family what they thought. They immediately said a messy bun with a braid up the back. Done. No hairspray, teasing or curling required.

As you can see, I switched it up this time. Last time I did a regular French braid up the back, but this time I opted for a reverse French braid. I loved it~!
Happy New Year!

From the Arc-HIVE II.

Here's to reminiscing hairspray, teasing, dyeing and frying:

May, 2007 with my brother Stewart.

Have a margo for me :)